开发环境
编译环境
C++ 编译器是将 C++ 源代码转换为机器代码的工具。不同平台/系统有不同的C++编译器支持,几个主流的C++编译器如下:
跨平台,Linux常用,与GNU工具链集成,优化能力强,适合高性能计算和嵌入式开发。基础使用:
Clang:
跨平台,原生支持macOS,编译速度快,与LLVM工具链集成,错误信息友好,适合开发和调试。
MSVC:
Only Windows,与Visual Studio一起提供,集成性能分析工具,适合 Windows 应用开发。
基本使用方式(以GCC/Clang为例):
1
2
3
4
5
6
7
8
9
10
11
12
13
14
# 编译并链接
# --std: 指定C++标准
# -Wall: 启用所有警告
# -O2:
# -Iinclude: 添加包含路径
# -Llib: 添加库路径
# -lmy_library: 链接库
g++ -std=c++11 -Wall -O2 -Iinclude -Llib -o my_program main.cpp lib.cpp -lmy_library

# 生成调试信息
g++ -g -o my_program my_program.cpp

# 生成预处理文件
g++ -E my_program.cpp > output.i
工作环境
以VSCode为例:
基础环境安装
安装编译器:
1
2
3
sudo apt-get install g++
# brew install g++
# brew install clang
VSCode安装C/C++扩展
配置编译环境
VSCode通过
tasks.json/launch.json/c_cpp_properties.json来配置:1 2 3 4 5
my_project/ ├── .vscode/ │ ├── tasks.json │ ├── launch.json │ └── c_cpp_properties.json
task.json主要定义编译任务,以GCC为例:1 2 3 4 5 6 7 8 9 10 11 12 13 14 15 16 17 18 19 20 21 22 23
{ "version": "2.0.0", "tasks": [ { "label": "build", "type": "shell", "command": "g++", "args": [ "-g", "-std=c++11", "-o", "${workspaceFolder}/bin/my_program", "${workspaceFolder}/src/main.cpp" ], "group": { "kind": "build", "isDefault": true }, "problemMatcher": ["$gcc"], "detail": "Generated task by VSCode" } ] }
launch.json主要定义调试配置,如基于GDB/LLDB:1 2 3 4 5 6 7 8 9 10 11 12 13 14 15 16 17 18 19 20 21 22 23 24 25 26 27 28 29 30 31
{ "version": "0.2.0", "configurations": [ { "name": "Debug C++", "type": "cppdbg", "request": "launch", "program": "${workspaceFolder}/bin/my_program", "args": [], "stopAtEntry": false, "cwd": "${workspaceFolder}", "environment": [], "externalConsole": false, "MIMode": "gdb", "setupCommands": [ { "description": "Enable pretty-printing for gdb", "text": "-enable-pretty-printing", "ignoreFailures": true } ], "preLaunchTask": "build", "miDebuggerPath": "gdb", "logging": { "trace": true, "traceResponse": true, "engineLogging": true } } ] }
c_cpp_properties.json用于配置 IntelliSense 和头文件路径1 2 3 4 5 6 7 8 9 10 11 12 13 14 15 16 17 18
{ "configurations": [ { "name": "Linux", "includePath": [ "${workspaceFolder}/include", "/usr/include", "/usr/local/include" ], "defines": [], "compilerPath": "/usr/bin/g++", "cStandard": "c11", "cppStandard": "c++17", "intelliSenseMode": "gcc-x64" } ], "version": 4 }
构建工具
构建工具的核心作用是自动化和标准化开发流程,如自动化编译和链接、管理依赖关系、跨平台支持等,常用的构建工具如:
| 构建工具 | 特点 | 适用场景 |
|---|---|---|
| CMake | 跨平台,功能强大,广泛使用 | 跨平台项目、大型项目 |
| Bazel | 高性能,支持多语言,配置复杂 | 大型项目、多语言项目 |
| Ninja | 专注于构建速度,适合作为底层构建工具 | 快速构建、作为其他工具的后端 |
| Autotools | 传统工具,支持自动配置,逐渐被取代 | Unix/Linux 平台开发、传统项目 |
| SCons | 基于 Python,配置灵活,构建速度较慢 | 中小型项目、需要灵活配置的项目 |
| Premake | 基于 Lua,配置简单,支持多种构建系统 | 中小型项目、需要简单配置的项目 |
| Gradle | 基于 Groovy/Kotlin,支持多语言,C++ 支持较弱 | 多语言项目、Java 与 C++ 混合项目 |
| Xcode | 集成在 Xcode IDE 中,仅限于 Apple 平台 | macOS/iOS 平台开发 |
以下以CMake为例介绍基础的用法,通常分为两部分:
CMakeLists.txt编写
1
2
3
4
5
6
7
project(MyProject CXX)  # 定义项目名称和语言
add_executable(my_program main.cpp) # 添加可执行文件
add_library(my_library STATIC my_library.cpp) # 添加库
include_directories(include) # 包含头文件目录
target_link_libraries(my_program my_library) # 链接库
target_link_libraries(my_program my_library) # 设置编译选项
set(CMAKE_CXX_STANDARD 11) # 设置变量
CMake编译
基于上述CMakeLists.txt文件的工作目录如下:
1
2
3
4
5
6
7
MyProject/
├── CMakeLists.txt
├── include/
│   └── my_library.h
├── src/
│   ├── main.cpp
│   └── my_library.cpp
在以上基础编译和运行:
1
2
3
4
5
mkdir build
cd build
cmake ..  # 得到MakeFile
cmake --build .
./my_program
开发工具
格式化工具
Clang-Format是LLVM项目常用的代码格式化工具。
命令行格式化:
1
2
3
clang-format -i my_file.cpp  							  # 格式化单个文件
clang-format -i *.cpp        							  # 格式化所有 .cpp 文件
clang-format -style=Google -i my_file.cpp   # 指定代码风格
配置文件 :
1
2
3
# .clang-format
BasedOnStyle: Google
IndentWidth: 4
调试工具
GDB(GNU Debugger)基础用法(LLDB类似):
1
2
g++ -g -o my_program my_program.cpp # 编译时生成调试信息
gdb ./my_program # 启动GDB
常用命令:
break <行号>:设置断点。run:运行程序。next:单步执行(不进入函数)。step:单步执行(进入函数)。print <变量>:打印变量值。backtrace:查看函数调用栈。quit:退出 GDB。
单元测试
常用的C++的单元测试库有:Boost.Test和Catch2。
Boost.Test
基础用法如下:
1
2
3
4
5
6
7
8
9
10
11
12
13
14
15
16
17
18
19
20
21
22
23
24
25
26
27
#define BOOST_TEST_MAIN
#include <boost/test/unit_test.hpp>
#include <stdexcept>

void test(int n)
{
  if (n == 42) {
    return;
  }
  throw std::runtime_error(
    "Not the answer");
}

BOOST_AUTO_TEST_CASE(my_test) // 定义测试用例
{
  BOOST_TEST_MESSAGE("Testing");
  BOOST_TEST(1 + 1 == 2);
  BOOST_CHECK_THROW( // 检查抛出异常
    test(41), std::runtime_error);
  BOOST_CHECK_NO_THROW(test(42));

  int expected = 5;
  BOOST_TEST(2 + 2 == expected);
  BOOST_CHECK(2 + 2 == expected); // 与BOOST_TEST不同的是:不会尝试输出表达式内容
}

BOOST_AUTO_TEST_CASE(null_test) {}
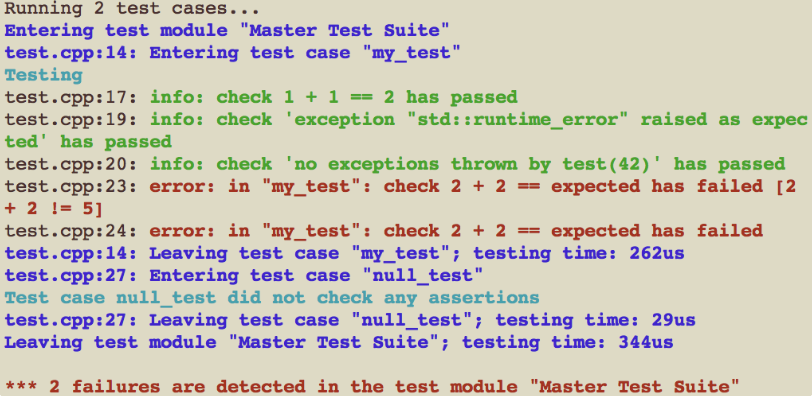
显示结果如下(可以通过添加命令行参数:
--log_level=all): 「」
「」Catch2
Catch2的优势在于:
- 只需要单个头文件即可使用,不需要安装和链接,简单方便
- 可选使用 BDD(Behavior-Driven Development)风格的分节形式
- 测试失败可选直接进入调试器(Windows 和 macOS 上)
使用如下:
1
2
3
4
5
6
7
8
9
10
11
12
13
14
15
16
17
18
19
20
21
22
23
24
25
26
#define CATCH_CONFIG_MAIN
#include "catch.hpp"
#include <stdexcept>

void test(int n)
{
  if (n == 42) {
    return;
  }
  throw std::runtime_error(
    "Not the answer");
}

TEST_CASE("My first test", "[my]")
{
  INFO("Testing");
  CHECK(1 + 1 == 2);
  CHECK_THROWS_AS(
    test(41), std::runtime_error);
  CHECK_NOTHROW(test(42));

  int expected = 5;
  CHECK(2 + 2 == expected);
}

TEST_CASE("A null test", "[null]") {}
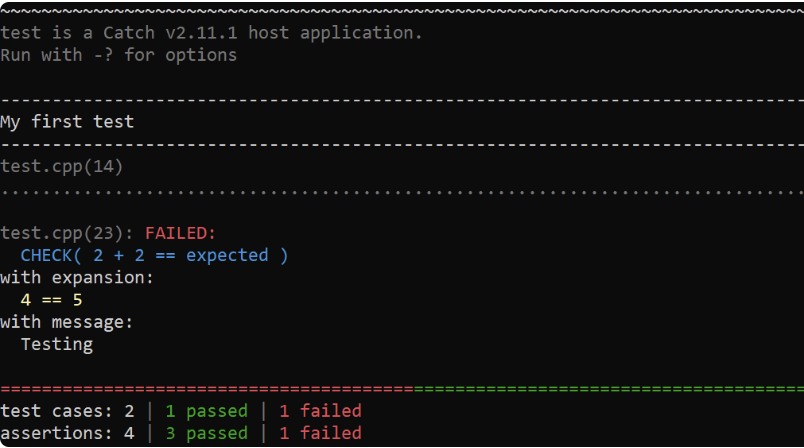
结果如下:

性能分析
Linux内置了很多性能分析工具,如top、vmstat等
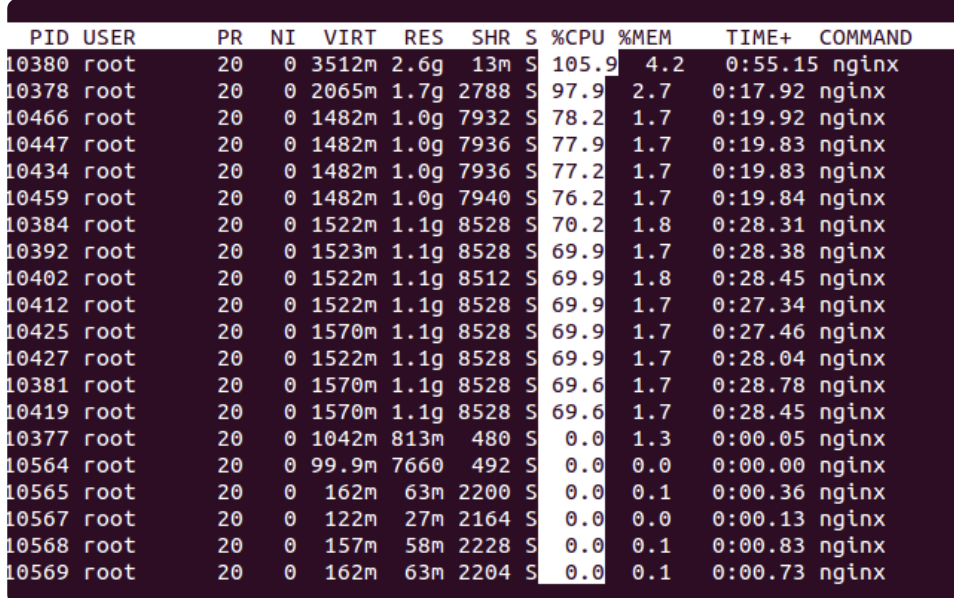
top的输出结果中,可以看到进程运行概况、CPU,内存使用率等

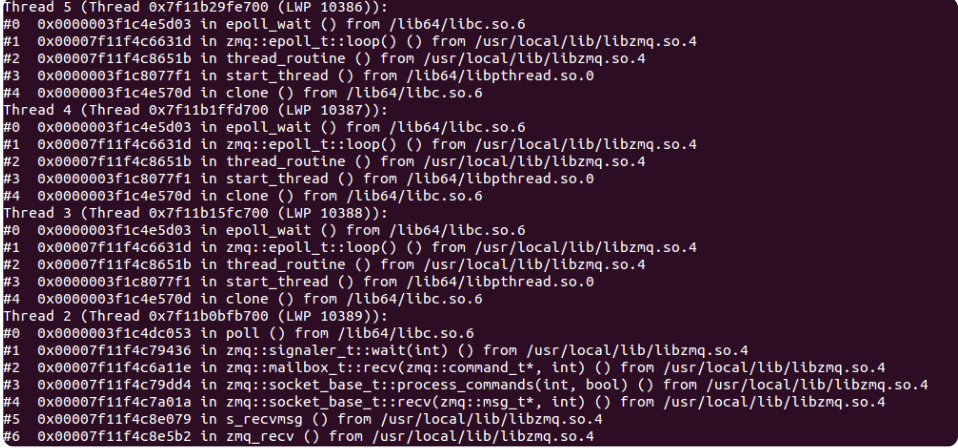
pstack/strace:pstack可以打印进程的调用信息:

strae可以显示进程的正在运行的系统调用,实时查看进程与系统内核交换了哪些信息:

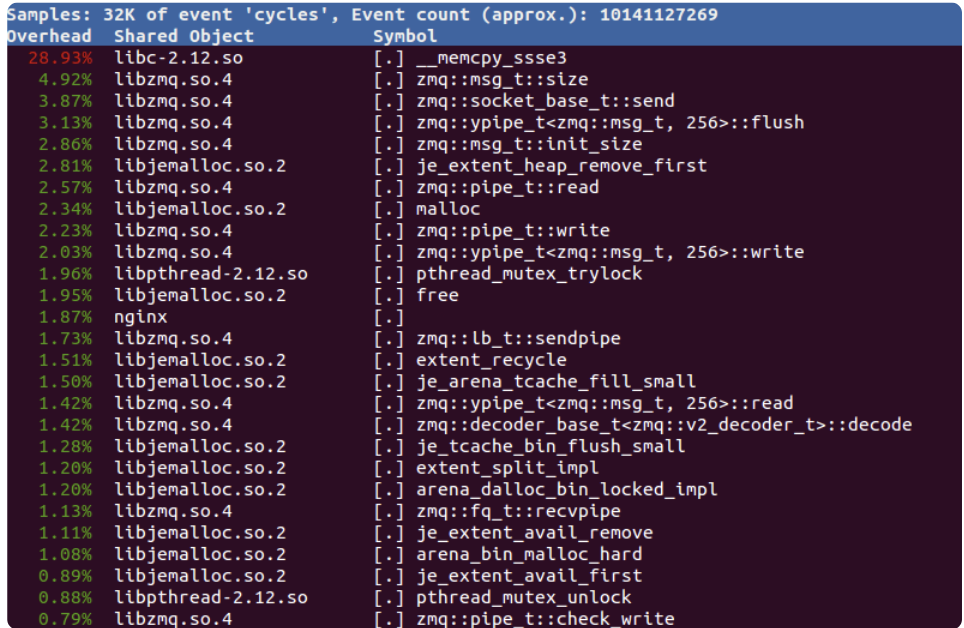
perf:可以按照固定频率采样,即多次pstack,得到函数的调用情况,如
perf top -K -p xxx,按 CPU 使用率排序,只看用户空间的调用,这样很容易就能找出最耗费 CPU 的函数。
源码级别的分析,需要一些“侵入式”的手段,如Google Performance Tools,包括
CPUProfiler和HeapProfiler,安装如下:1 2
apt-get install google-perftools apt-get install libgoogle-perftools-dev
基础用法:
ProfilerStart(),开始性能分析,把数据存入指定的文件里;
ProfilerRegisterThread(),允许对线程做性能分析;
ProfilerStop(),停止性能分析。
简单使用如下,这里用
shared_ptr实现一个自动管理功能。这里利用了void*和空指针,可以在智能指针析构的时候执行任意代码(简单的RAII惯用法):
1
2
3
4
5
6
7
8
9
10
11
12
13
auto make_cpu_profiler =            // lambda表达式启动性能分析
[](const string& filename)          // 传入性能分析的数据文件名
{
  ProfilerStart(filename.c_str());  // 启动性能分析
  ProfilerRegisterThread();         // 对线程做性能分析

  return std::shared_ptr<void>(     // 返回智能指针
    nullptr,                        // 空指针,只用来占位
    [](void*){                      // 删除函数执行停止动作
        ProfilerStop();             // 停止性能分析
    }
  );
};
基于
make_cpu_profiler测试功能:1 2 3 4 5 6 7 8
auto cp = make_cpu_profiler("case1.perf"); // 启动性能分析 auto str = "neir:automata"s; for(int i = 0; i < 1000; i++) { // 循环一千次 auto reg = make_regex(R"(^(\w+)\:(\w+)$)");// 正则表达式对象 auto what = make_match(); assert(regex_match(str, what, reg)); // 正则匹配 }
运行测试:
1
2
3
4
5
6
7
8
9
10
11
12
13
14
15
git clone git@github.com:gperftools/gperftools.git

pprof --text ./a.out case1.perf > case1.txt

Total: 72 samples
  4   5.6%   5.6%   4   5.6% __gnu_cxx::__normal_iterator::base
  4   5.6%  11.1%   4   5.6% _init
  4   5.6%  16.7%   4   5.6% std::vector::begin
  3   4.2%  20.8%   4   5.6% __gnu_cxx::operator-
  3   4.2%  25.0%   5   6.9% std::__distance
  2   2.8%  27.8%   2   2.8% __GI___strnlen
  2   2.8%  30.6%   6   8.3% __GI___strxfrm_l
  2   2.8%  33.3%   3   4.2% __dynamic_cast
  2   2.8%  36.1%   2   2.8% __memset_sse2
  2   2.8%  38.9%   2   2.8% operator new[]
可以基于
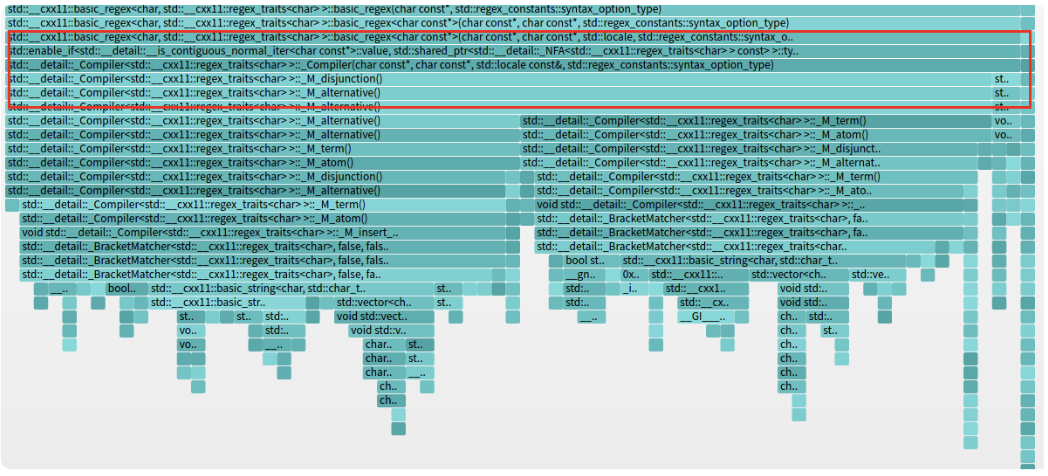
Graphviz和FlameGraph生成火焰图:1 2 3 4 5 6 7 8
apt-get install graphviz git clone git@github.com:brendangregg/FlameGraph.git # 基于--svg/--collapsed生成可视图 pprof --svg ./a.out case1.perf > case1.svg pprof --collapsed ./a.out case1.perf > case1.cbt flamegraph.pl case1.cbt > flame.svg flamegraph.pl --invert --color aqua case1.cbt > icicle.svg
 「」
「」